Building a Better Cat Bathroom
Filed Under Gadgets & Hardware, Geek, Lifehacks | 2014-04-21, 14:19
I’ve had cats for many years. This means I’ve had to deal with litter boxes for just as long. When you have one cat, it’s not a big deal. However when you have three of them, like we do, the litter box challenges are greater. For years I dreamed about solving all of these challenges with the perfect litter box situation. We haven’t quite achieved that level of greatness, but what we’ve put together is pretty damn close.
With 3 cats we’ve had 2-3 litter boxes. They’ve been placed in laundry rooms, bathrooms, kitchens, closets, showers, tubs, and just about anywhere in an attempt to make them work. Up until now we rented, so we never wanted to invest the time or money into a more permanent solution. Plus none of our rental apartments had the space for it! When we finally bought a house last year, we resolved to finally solve this problem: Introducing the Cat Bathroom.
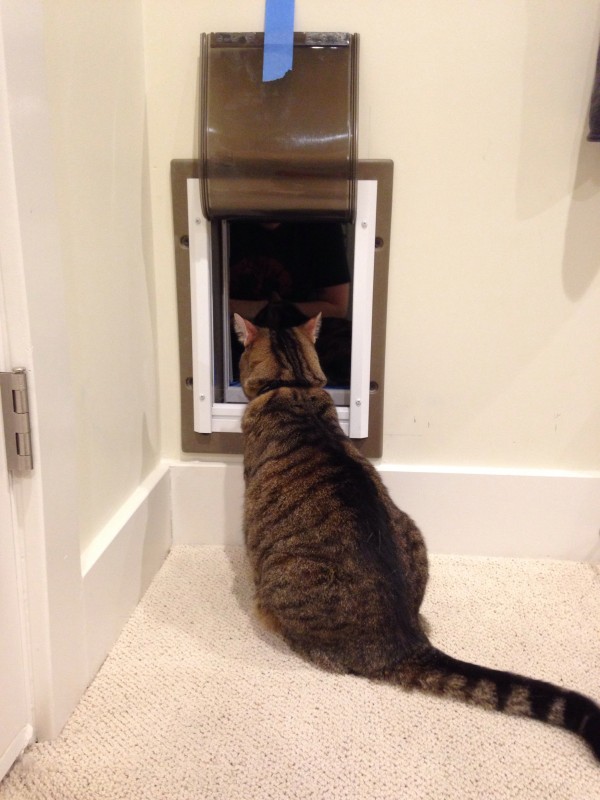
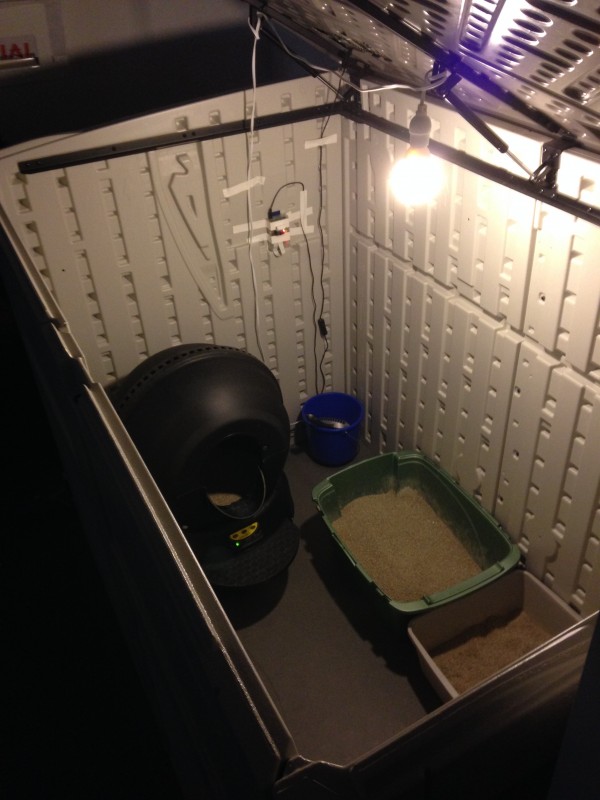
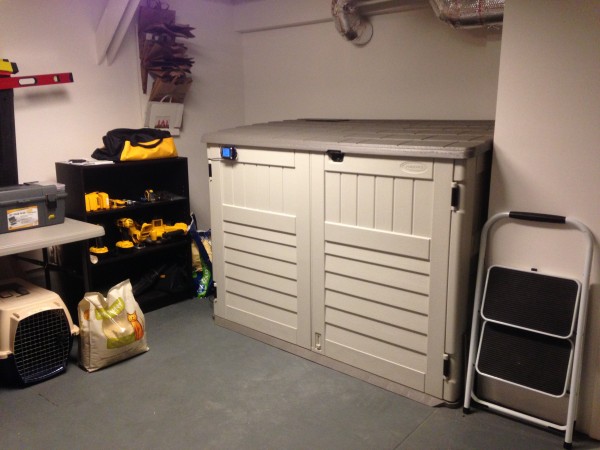
The Cat Bathroom was originally designed as an additional room with framing and doors and whatnot, but then we found a garden shed that was the perfect size. It comfortably holds 3 litter boxes and gives the cats plenty of room to walk around and do their business. In a single afternoon we assembled the shed, cut a hole in the side with a jigsaw, and then cut a hole in the wall between our downstairs room and the garage so that we could install the cat door. The cats love it, and we’ve had almost no “registering of complaints” in other areas of the house.
Inside the Cat Bathroom we have three litter boxes. One of the litter boxes is a Litter Robot, which cleans itself. I highly recommend these if your cat will use it. Some of our cats aren’t as fond of it, so we’ve still got two normal boxes. In order to get into the Cat Bathroom, the cats have to climb through the pet door. Since it’s not level with the ground, the cats don’t track the loose litter out into our living space. No longer do we have to step on litter when using a “shared” bathroom barefoot. The shed also has two large doors that swing open and a hydraulically assisted lid that allows for super easy cleaning of the boxes. Because it’s already in the garage it means we never have dirty litter sitting in the house waiting to be taken out.
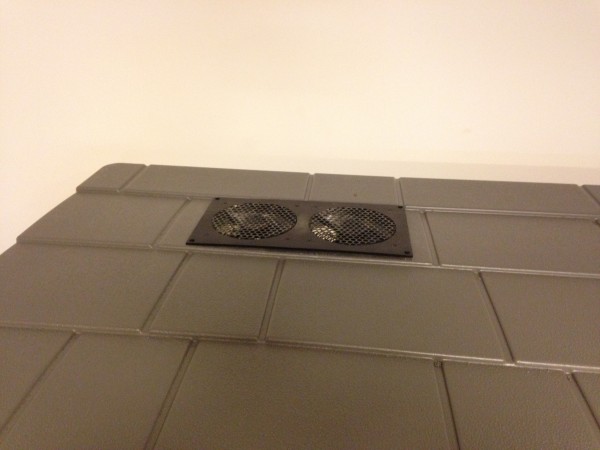
We learned a very important lesson after the first few days of the Cat Bathroom: ventilation is important. The smell of opening the lid after the first few days was overpowering. A simple exhaust fan found on Amazon and some more jig saw cutting and that problem was easily solved. It exhausts into the garage, which has enough air flow that the smell is never noticed. Gone are the days of nice dinners ruined by the smell emanating from the corner of the kitchen.
Most people would probably stop with that setup and call it good. However I’m not “most people” and wanted to make it a little bit fancier. I’ve already implemented a large amount of home automation with Insteon/X10 hardware and Indigo software. Since I already had that all setup, and I had a leftover X10 motion sensor, I decided to use it — in conjunction with Splunk — to track how often the cats used the litter box. It was an excellent way to make sure full adoption of the Cat Bathroom was happening at the beginning.
The X10 motion sensor sits right inside the door, so the cats trigger it whenever they walk in. It sends a signal to an X10 receiver, which is then picked up by the Indigo software. The Indigo software logs the trip, increments a variable counting the number of trips, and then calls a custom python script that posts a randomly selected message to the Twitter account setup for the @CatBathroom. The Twitter account has 13 followers. I’m still not sure why.
"Why are you following @catbathroom?" – @edrabbit
"YOU'RE the one who made a account about your cat's litterbox. WE aren't the weird ones."
— KC (@KdotCdot) January 29, 2014
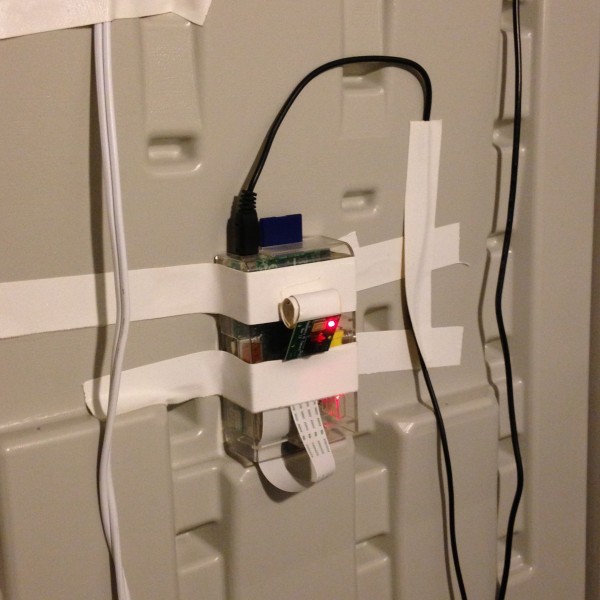
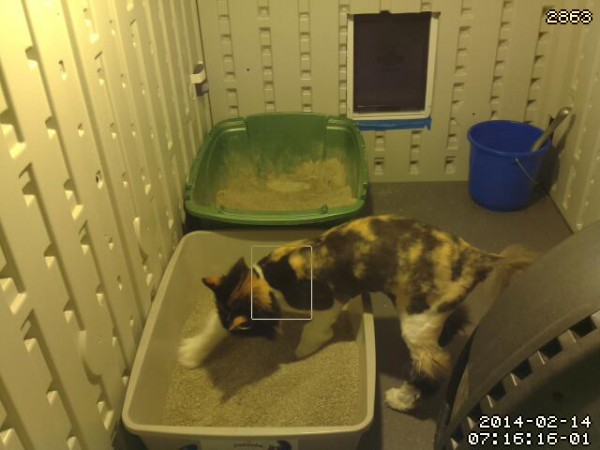
As part of “making sure the cats are using it” I wanted a way to know which cat was using it so we were sure all 3 of them were on board. I happened to have a Raspberry Pi and a camera module sitting on my desk. A little bit of work later and I had motion triggered video recording setup with it. As you can see, I’ve opted for the super high-tech “wad of tape” method of mounting and aiming the camera. I also found out that the Raspberry Pi camera wasn’t so hot at low-light, so I hung an LED bulb in there that’s always one. I like to think that in addition to making the camera work, it also makes the Cat Bathroom friendlier than the dark cave it used to be.
Now we have security camera style footage of the cats using the bathroom. Yes, it’s weird to watch it. If anyone needs almost 2gb of cats and litter boxes for a bizarre art project, get in touch with me. I will admit, there’s a bit of a temptation to hook up automated photo uploading to the Twitter account. Be warned.
The Cat Bathroom solved many of our problems, but it turned out that it caused one rather big one. Since the litter boxes were hidden away from sight, we had a tendency to forget about them. This meant it would be several days before we realized “oh yeah, we need to clean the litter boxes”. Needless to say the cats were a little unhappy about it. Enter an over-engineered solution…
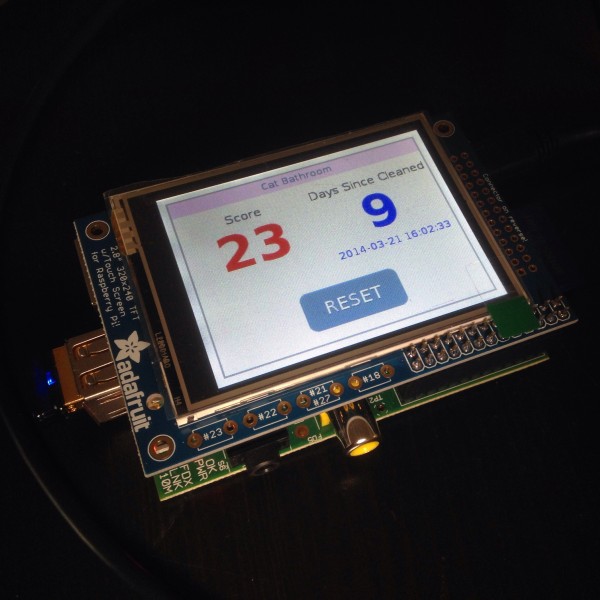
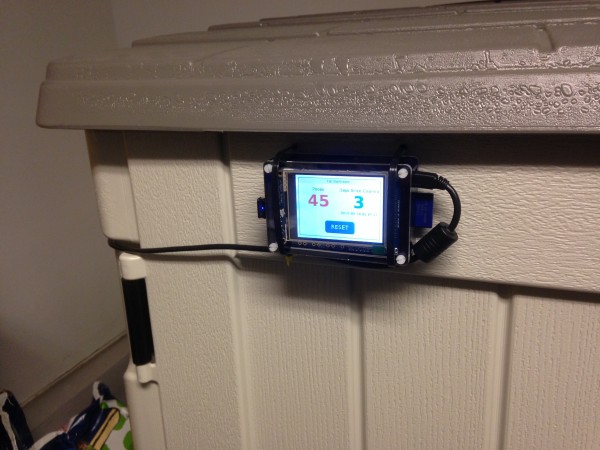
Another Raspberry Pi plus a small LCD touchscreen for display was the hardware of choice. I threw together a super simple flask based webserver that would query the Indigo API for the number of trips the cats had made to the bathroom and also calculate how many days it had been since the last cleaning. If either number gets to high, it turns red to draw attention to our lack of diligence. And there’s a button to tap when I clean the litter box, which resets the counters (and of course sends a tweet). I noticed it occasionally crashing and not reloading the page, so I tossed it on a WeMo switch so I can reset it easily.
You can check out the code I’m using over on github. I’m hoping to turn it into a more full-fledged house server with more than just the Cat Bathroom status at some point.
Another smaller problem I ran into was that the cats had learned to jump directly into the Litter Robot, bypassing the step that triggers the countdown to cleaning. This meant the Litter Robot wasn’t cycling and cleaning itself after every use. Sure I could just go in there and manually switch it off and back on again in true “IT Crowd” fashion to force a cleaning, but that’s too easy. I had a WeMo switch left over from our Christmas tree lights, so I plugged the Litter Robot into it. Now I can clean one of the litter boxes from my phone.
So what’s next for the Cat Bathroom? RFID collars and litter box weight analysis are just some of the suggestions I’ve heard. But I wouldn’t want to get too carried away with this…
Cost breakdown
Suncast 3′ x 8′ x 5.11′ Storage Shed – $350
Pet Door – $88
Cabinet fan for exhaust – $35
Raspberry Pis, camera, LCD, motion sensor, WeMos, etc – [REDACTED]
Not stepping in cat litter when getting out of the shower: Worth every single penny.
More Pictures in the Flickr Set
Go Splunk Yourself!
Filed Under Gadgets & Hardware, Geek, Self Tracking | 2013-10-17, 10:29
Full Disclaimer: I’ve been working at Splunk for close to 4 years now as a software engineer. For those that aren’t familiar with Splunk, it’s a tool intended to collect machine generated data (aka log files), index it, and allow you to search and report on it. Most companies use Splunk in their IT department to monitor and troubleshoot problems, but it’s really starting to branch out into all areas of businesses. After discovering Splunk, it didn’t take long for me to realize I could use it myself even though I wasn’t running a huge IT department. Of course I threw a bunch of my web server logs at it and started fixing errors, but that’s par for the course. Things started getting interesting when I decided I was going to Splunk myself.
With the rise of the Quantified Self movement, more and more biometric devices and self-tracking tools are becoming available to normal consumers. As we start using more devices that track more variables, the amount of data generated frows exponentially. Devices like the Basis allow you to track things like your heart rate or skin temperature on a minute by minute basis, resulting in thousands of data points every day. It’s debatable whether we can call this “Big” Data since it only accounts to a few megabytes, but it definitely scales outside the realm of manual handling very quickly.
The Basis is just one device that you can use to help track yourself. There are hundreds more. Personally I’m currently (or within the past year) tracking the following:
Hardware:
- Fitbit Zip – steps (also tracking my cat Bunki with a Fitbit)
- Nike Fuelband – steps and activities
- Basis B1 Band – steps, heart rate, skin temperature, air temperature, and galvanic skin response
- Withings scale – weight and fat mass
- Garmin Forerunner 610 – GPS location, heart rate (paired with a Wahoo ANT+ HRM), and pace for my runs and bike rides
- Lumoback – posture
- Zeo – brain activity during sleep (Company out of business)
- Automatic – tracking car trips, mpg, and driving habits
Software:
- Moves (iOS/Android) – steps, passive tracking of places I’ve been, cycling, running
- Openpaths (iOS/Android) – geolocation
- Google Latitude (service discontinued) – geolocation
- foursquare (iOS/Android) – active tracking of places I’ve been
- Last.fm – Music listening habits
- Biologger – a custom web based app for tracking things like sneezes, last time I cleaned the litterbox, did the dishes, headaches, dyed my hair, etc.
- Email inbox – custom script for checking number of read and unread messages in my inbox
- Twitter – tracking my tweets @edrabbit
Each of these devices or apps has their pros and cons. Battery life, ease of syncing, and of course quality of data are all factors. But the biggest issue I ran into with Splunking myself was getting my data out of all these services.
If I was really lucky, a full-featured API was available (like Fitbit’s). Other times I had to settle for an export in CSV or some other format (like Zeo). Unfortunately there are a few services/devices that just don’t offer any official way to get your data out (I’m looking at you Basis).
Over time I was able to find a number of tools written by others to help free your data. Additionally I wrote several of my own tools to extract data and transform it into human-readable and Splunk-friendly log formats. All of my tools are available on my github page. I’ve got tools to fetch and/or format data from Fitbit, Nike Fuelband, Twitter, Google Latitude, GPX files, CSV files, Zeo, foursquare, and Basis.
But wait, I said Basis didn’t have any way to get your data out! As an excellent example of users finding ways to use things the way they want, there is a way to get your data out of Basis. One Basis user (Bob Troia) discovered that while Basis doesn’t offer an API to user, they do have an internal API where JSON is passed through the browser in order to show you dashboards with your data. All it took was a little bit of scripting to grab this automatically and suddenly we all had control of our own data. You can find his Basis Data export tool here. This was great, but the data was exported in a horrible combination of JSON and CSV. Luckily one of my scripts can turn it into minute by minute log files as if they were generated on the fly. There are a bunch of other self-tracking hackers out there building tools like this. They’re often easy to find, but to help I’ve started to try to catalog them at wiki.biologger.com
Armed with all these devices generating data and the appropriate tools for fetching and formatting it correctly, I was finally able to feed all of this into Splunk. Let’s take a look at some of what I’m able to get out of this.
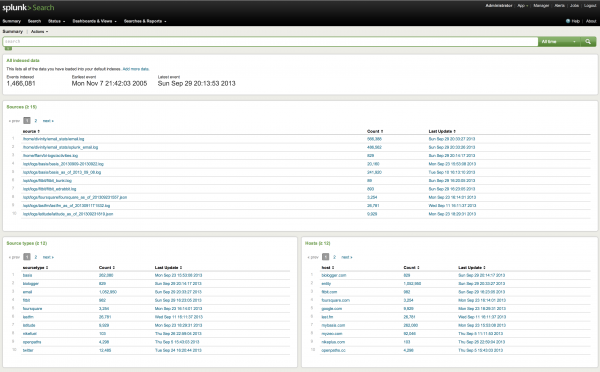
I have around 1.5 million events logged in Splunk, taking up only a couple hundred megabytes. For anyone already familiar with Splunk, this is obviously within the 500mb index limit of the free product, which means anyone can do this without shelling out cash for a license.
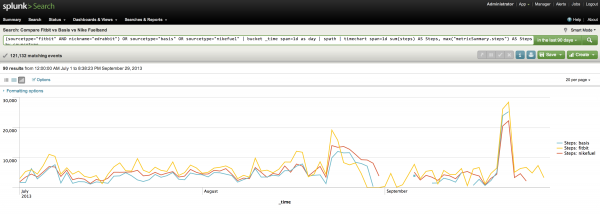
One of the most common questions when people learn I’m using all these devices is how they compare to each other. Previously I could only give a vague sort of answer about how I thought the Fitbit was the most accurate and that the other devices where a few thousand off each day. But with Splunk I’m able to generate a visualization comparing the Fitbit with the Basis and the Fuelband. It’s true, they don’t give similar numbers, but they do seem to track similarly over time.
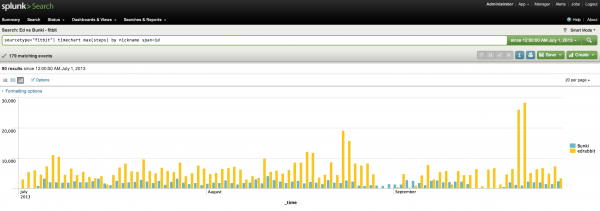
How do I compare to Bunki in steps?
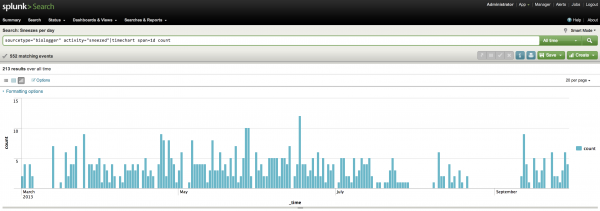
How many times have I sneezed each day?
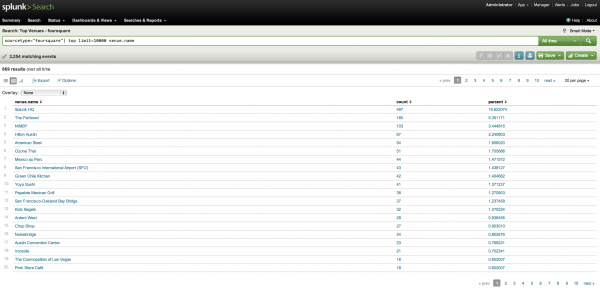
What venues have I checked in at with foursquare the most over the past 8 years?
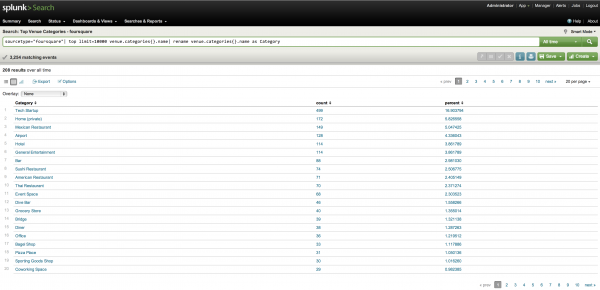
What kind of venues do I tend to check in at?
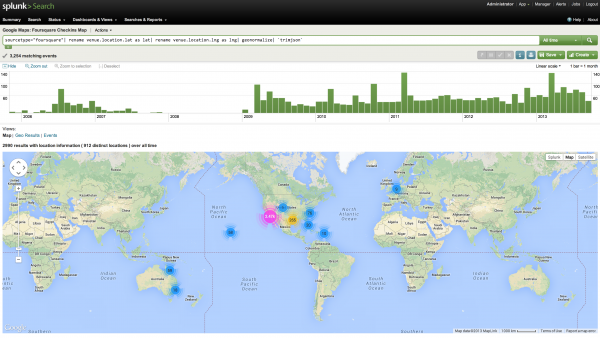
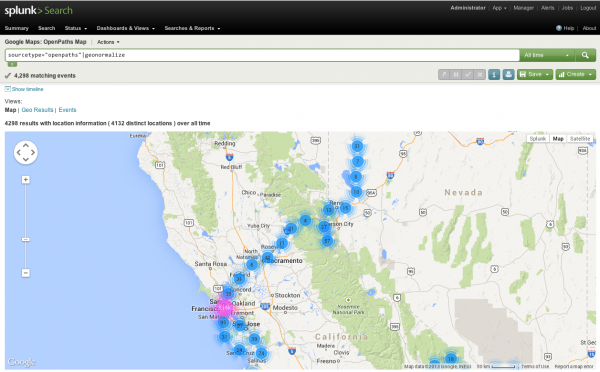
With the Google Maps App for Splunk 5 I can even plot all of these checkins on an interactive map. (The newest version of Splunk 6 comes with maps built in)
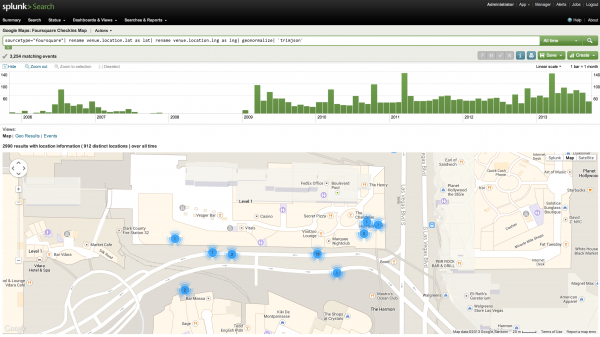
I can also use this to see exactly where I went on trips, what restaurants I ate at, and what activities I did. So next time a friend asks what’s good to do in a city I’ve visited I can just pull up the map and show them exactly where to go. Here’s an example map from Splunk’s .conf in Vegas last year:
The maps above are based on foursquare data, which requires active check-ins at specific venues. However tools like Google Latitude and Openpaths simple record latitude and longitude over time, so you get a more detailed report on my movements. Here’s Openpaths tracking me around San Francisco and my journeys to the Black Rock Desert.
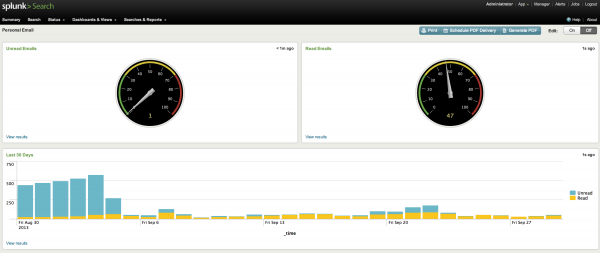
Or how about the current state of my email inbox? I’m tempted to put this up on a screen at home so I can see how many unread messages I have without having to open up my inbox.
What about my favorite music based on Last.fm? This is an interesting one that also shows off how multipurpose Splunk can be. As you can see I listened to a single song (The Acoustic Hoods – Cycles of Time) several times more than all other songs. In Splunk I can click on that pie piece and it will show me every single time that song was logged as played. Turns out I left the song running on repeat on my work computer when I went home for the evening and it looped all night long. Oops. Luckily with Splunk it’s easy to just exclude those events to get a more realistic picture if that’s what I wanted.
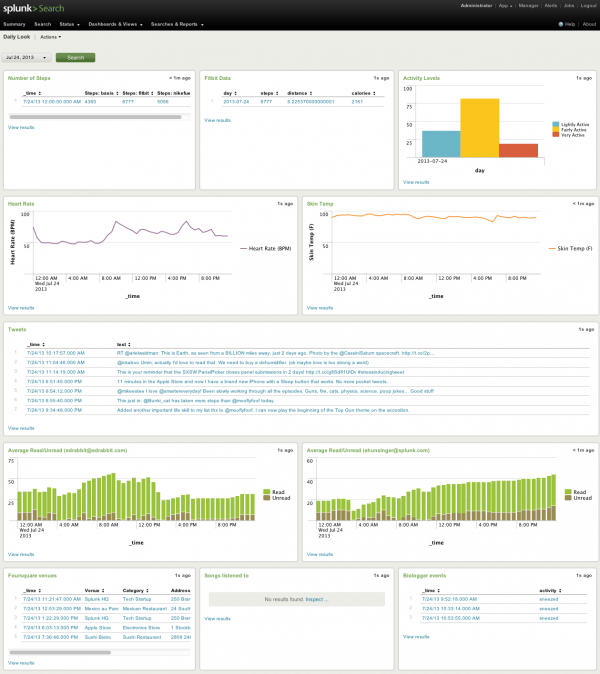
This is all pretty simple stuff that even the newest of Splunk users can do. It’s mainly looking at just one data source. What I really wanted was to be able to see a picture of any day of my life and know what that day was like for me. SO I put together a dashboard that lets me do just that. It pulls in info from various different services that have vastly different formats and lets me see it all on one page instantly. No more clicking from site to site to site. I’m still working on getting more and more relevant data in, but if you take a look at the screenshot below you’ll see exactly what July 24th, 2013 looked like for me. Based on my heart rate around 9am and 6pm it looks like I biked to work, I ate lunch at Mexico au Parc, went to the Apple store to get my iPhone replaced, sneezed 3 times in the morning, and learned how to play Top Gun on the accordion.
What’s next?
Keen-eyed Splunk users will notice in the Summary screenshot that some of the data sources are data dumps and not actually feeding into Splunk live. I want to work on getting everything feeding into Splunk automatically so it is all constantly up to date rather than have to take 20 minutes to sit down and get new data dumps from the various services.
I also want to start Splunking my house. I’ve got a Nest, a wifi washing machine, and more and more devices becoming internet enabled. It’s just a matter of grabbing it and feeding it into Splunk.
You can download the free version of Splunk which is available for almost every platform, or you can give our hosted (and also free) Splunk Storm a try. There’s a slight learning curve to using Splunk, but if you can use Google, you can learn to use Splunk. I’d love to hear from anyone else out there that either wants to or already has started Splunking themselves. Shoot me an email or drop me a tweet @edrabbit!
Putting A Fitbit on My Cat
Filed Under Gadgets & Hardware, Self Tracking | 2013-07-07, 21:34

I’ve been carrying a Fitbit around for 2+ years, generating all sorts of data as part of my ongoing preoccupation with self tracking. I’m not sure where the original idea came from, but somehow I got it into my head that my cat, Bunki, should join me on this quantified self journey. Perhaps it had something to do with her slight roundness. Due to a combination of factors (losing a Fitbit, buying a new one, having that one get run over a week later, Fitbit generously replacing the run-over one, and then me finding the lost one) I ended up with an extra Fitbit Zip that was perfect for Bunki.
I imagine some cats wouldn’t be too into the idea of lugging around a Fitbit, but I figured we’d give it a try. Luckily Bunki had worn a collar in the past, and she’s a 100% indoor cat, so there was a chance this could work without annoyance and without losing another device. I started out with just the collar to make sure she was still cool with that. Then I added just the silicone skin without the actual Fitbit. She didn’t even seem to notice it after the first minute or two, so a few hours later I added in the actual device and set up a Fitbit account of her own! A couple days later and there have been no complaints.
Since Bunki doesn’t have an iPhone she couldn’t just sync over Bluetooth Smart, so I used the tiny USB receiver that comes with the Zip. It’s plugged into a Windows machine that I have running 24/7. It just happens to currently be in the same room as her litter box right now, so it all happens automatically. When we inevitably move the litter box, I’ll have to figure out a new solution. I think treats will probably be involved. One of the big benefits of the Fitbit Zip, besides its smaller size, is that the battery will last 4-6 months, so Bunki doesn’t have to worry about charging anything.
I have no idea how accurate the step count is (you try calibrating that), I don’t know if she gets to double her score since she has four legs, and I’m sure there’s some cheating perhaps going on when she’s scratching. But all in all the data appears to be pretty good as long as you use it comparatively.
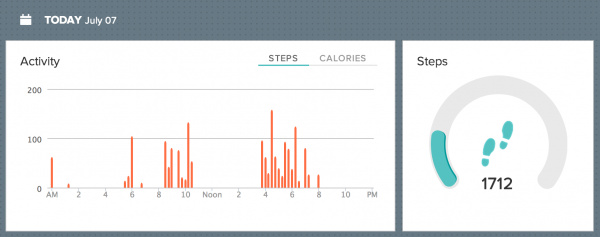
You’ll notice that somebody was taking a nap from 11am-3pm while we were out of the house. Proof that yes, the cat has not even moved from that spot since we left.
And it turns out Bunki is not the only cat with a Fitbit (and Twitter) account. Both @zzaps_cat and Tsunami (@Tsu_Cat) have them too.
NeverWet means superhydrophobic cardboard
Filed Under Gadgets & Hardware, Geek, Hacks and Mods, Lifehacks, Video | 2013-07-05, 14:50
This cardboard hates water. This was my first test run with NeverWet to see how well it works. NeverWet is a superhydrophobic coating that can be applied to just about anything. It comes in a pair of spray cans and takes a few hours to fully dry. Then whatever you treated will never get wet. It literally repels the water. What should I do next?
Here’s a video from the makers with some more examples:
Lifeloggers Documentary
Filed Under Gadgets & Hardware, Geek, Lifehacks, Self Tracking, Video | 2013-06-06, 00:23

Memoto presents a short (23 minute) documentary on Lifeloggers. It’s a great conversation with a number of the characters in the Quantified Self, Lifelogging, Self-Tracking, “Record All The Things!” movement. I couldn’t help but smile when I saw Dave Asprey wearing a Splunk shirt. (Disclaimer: I work for Splunk and am using Splunk Storm to track my own self.) There’s also some good blog posts over on Memoto’s site including an interview with Steve Mann.
Quick Reviews of GoPro Accessories
Filed Under Gadgets & Hardware, Photography, Video | 2012-05-29, 11:00
As a birthday present this year, my wife got me a GoPro HD Hero2 camera that I had been wanting for quite some time. Over the past couple of months I’ve spent quite a bit of time with it, as well as money on accessories. After answering questions from other people interested in the camera and accessories, I figured I’d put together a post for reference. I’ll focus mainly on accessories since the camera itself is awesome and doesn’t really have any competition to compare it with.

Normal Accessories:
I got the GoPro HD Hero2 Outdoor edition, which comes with what are in my opinion the most versatile accessories. If you intend to use the GoPro for surfing or motorsports, one of the other editions might be better for you. However for most people I feel like the Outdoor edition is the best choice. Here are the accessories it comes with and my opinions:
– The Waterproof Housing is what you’ll probably be using a lot. Chances are you want a GoPro for rough conditions where you wouldn’t want to be using another camera. Whether it’s dust, water, or just weather, the waterproof housing will be what you turn to.
– The HD Skeleton Backdoor is good when you don’t need to be water/dust/weather-proof, and want to capture sound a little bit better. The GoPro doesn’t get great sound in the waterproof housing. Also if there’s a chance for fogging, this housing is a good solution.
– I’ve only used the Vented Helmet Strap once on my normal bike commute to work through San Francisco. It was a boring video as my commute is usually boring, but I imagine anyone doing mountain biking or something similar would find a good use for this.
– I haven’t found a use for the Head Strap yet.
– I’ve already used both Flat Surface Adhesive Mounts. I put one on the inside of my windshield to do a drive time-lapse. Then upon viewing the video realized I positioned the camera directly in front of a ding in my windshield. *fist shake* The other mount was used on the inside of the windshield to relocate the camera. I’ve heard that these mounts can be removed with heat (such as a hair dryer) and then potentially reused with the existing sticky tape, or just ripping that off and attaching cheap 3M high density foam sticky tape to it. I haven’t used the Curved Adhesive Mounts as the snow season out here sucked this year. I imagine next year I’ll use them to attach the GoPro to my snowboarding helmet
– Haven’t found a use for the Three-Way Pivot arm other than the extra screw thing. (See GoPro Tripod Mount)
– Also comes with a USB Cable, the default battery and other assorted mounting bits.
BlurFix GoPro Adapter
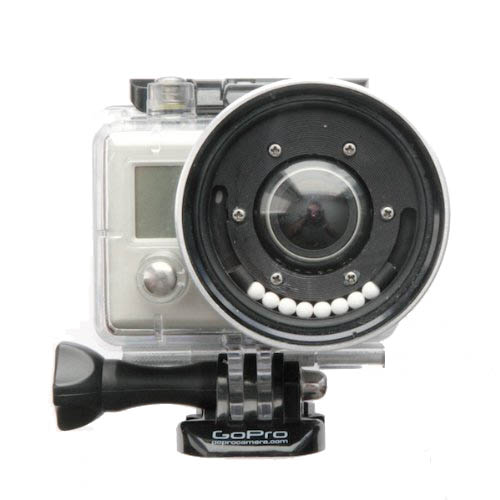
I modified the default waterproof housing by adding the BlurFix from Snake River Prototyping as I was planning on going diving in the British Virgin Islands and wanted crisp, clear video underwater. In the time since I modified my housing, GoPro has come out with a Dive housing that appears to have promise. I haven’t used one yet though, and will probably stick with the BlurFix for now since it’s what I have and it works well.
The BlurFix was relatively easy to add to the housing, however you can buy one with it already attached if you’re nervous about the process. The GoPro + BlurFix resulted in really nice video underwater for a couple of snorkeling trips in British Virgin Islands. However right before our SCUBA dive, I accidentally dropped the GoPro (ironically while adjusting the homemade wrist strap) and the filter on the front cracked. :( This meant all the subsequent dive trips were with the default GoPro housing lens. The difference in video from the default lens and the addition of the BlurFix is remarkable. If you’re filming underwater, don’t use the default waterproof housing.
Another thing I learned from my SCUBA footage is that the diving more than a few feet below the surface really begs for a lens filter. Snake River Prototyping includes a default UV filter with the BlurFix that has been filed down for a low profile (to reduce vignetting), but they also offer a number of other 55mm filters including filters intended for underwater use. As soon as I got home from the British Virgin Islands, I bought a replacement UV filter (plus a backup) as well as a URPro CY Filter from SRP so I would have them for the next trip. I also got the pricey $11 lens cap from SRP as the filed down low profile filters won’t take normal lens caps anymore. I have yet to play with other filters, such as polarizing filter, but in theory any normal 55mm filter should work, however there are reports of minor vignetting. One downside of the official GoPro Dive housing is that it won’t take any normal lens filters. It looks like it’s just a clear glass lens so I have to wonder how it does in deeper water in real life scenarios.
Conclusion: Worth the money for any underwater filming.
Battery BacPac
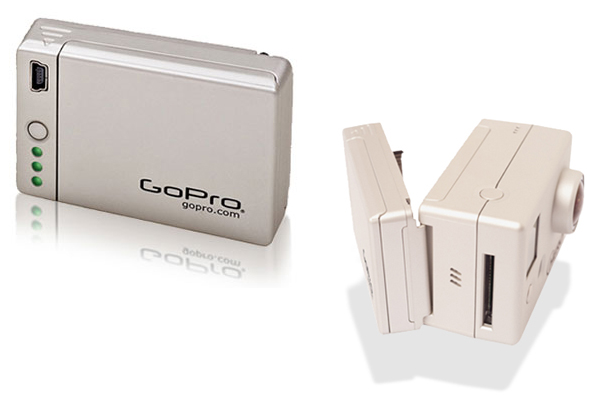
The Battery BacPac is by far the accessory I use the most. Since I do a lot of time-lapses I need the extra battery life. Fun Fact: Unlike other cameras, the GoPro remains powered on fully while doing a time-lapse, draining batteries in a couple of hours. If you’re doing a time-lapse or are planning on being away from a power source for a long time. The Battery BacPac and extra batteries are your friend. It’s also handy because you can use it as a battery charger in a pinch. And it’s a good way to know how much life you have left in a battery as it will be displayed by the green LEDs when you hit the button.
Conclusion: Worth the money.

Wasabi Battery and Charger Kit
One of the most annoying things I found out first about the GoPro was it’s lack of external charger. If you wanted to charge a battery you had to put it in the camera and plug it in via the USB cable. That meant no charging while shooting video out and about. I quickly bought the “Wasabi Power Battery and Charger Kit” which came with two additional batteries and a charger that would plug into both a normal wall outlet as well as an auto cigarette lighter outlet. All for less than $30. Hands down my first recommended accessory purchase. Pairing this with the Battery BacPac means I have yet to find myself in a situation where I’ve run out of battery power for my GoPro.
Conclusion: I couldn’t live without this.
LCD BacPac
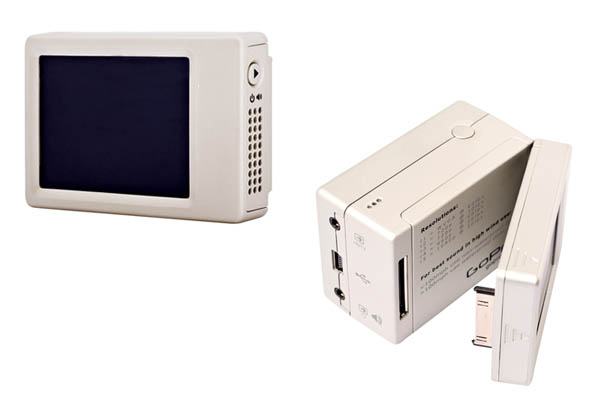
The GoPro LCD BacPac screen was purchased on a whim with a birthday gift card. It was one of those “nice to have, but not required” accessories. Because the GoPro has such a wide lens, it’s pretty easy to point it at something and capture what you want. It may not always be centered and level though. I noticed this often with my timelapses so I thought I’d give the LCD a try. It does help a bit. It’s also handy for playing back videos and provides a slightly better interface for the menu, however I rarely use it. I’d recommend shooting a couple videos with the GoPro first before deciding you need the LCD. It’s pricey, but for some people I can imagine it would be very important. Keep in mind though that it prevents you from using the Battery BacPac and will additionally drain your battery.
Conclusion: Meh, probably not worth the money unless you know need it.
GoPro Tripod Mount
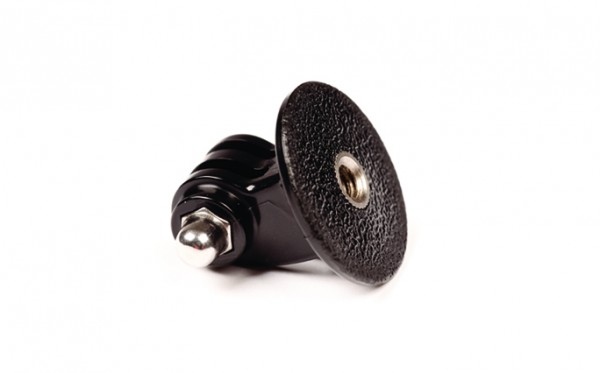
Buy it. It’s cheap, and it allows you to attach your GoPro to a number of different things. I personally use it mostly with an original GorillaPod. This is very useful if you’ve already invested in other camera mounting gear like tripods, monopods, GorillaPods, etc. This doesn’t come with a screw knob, but you can borrow the one of the Three-Way Pivot Arm.
Conclusion: No brainer if you have existing camera mounting hardware.
GoPro Suction Cup Mount
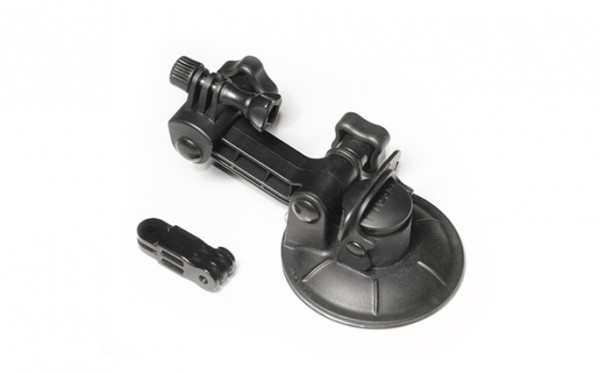
The GoPro Suction Cup Mount is one of the accessories I bought and have found myself most disappointed with. They say it’s supposed to keep your GoPro attached to a car (or even an airplane) at high speeds. I’ve only used it once, attaching it to an indoor window as a test to see how well the suction cup performed. It failed. I came back into the room and the camera was on the floor. I suspect that I may have needed to clean the suction cup and the window better, but my confidence in this mount has decreased so much that I’m worried about using it anywhere dangerous to the camera. I would definitely not recommend using it without some sort of backup device to prevent your camera from disappearing, i.e. a leash of some sort.
Conclusion: No sir, I don’t trust it one bit.
Additional Housings
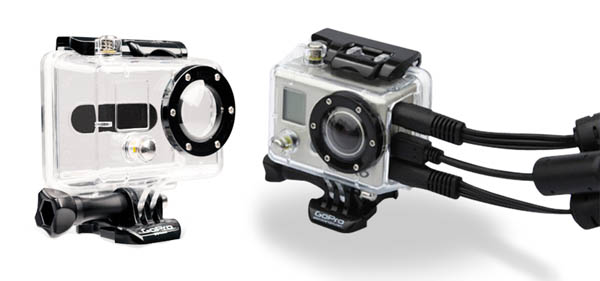
Since I modified my original housing to add the BlurFix adapter I realized that I no longer had a GoPro housing that was capable of handling rough and tumble situations since the glass lens was susceptible to breakage. So I recently bought an additional GoPro Waterproof Housing, as well as a GoPro Skeleton Housing. The Skeleton Housing is by no means weatherproof, however it gives you access to the GoPro ports while shooting video. This means you can attach an external power source, providing unlimited power for long videos and time-lapses. I look forward to doing some longer driving time-lapses with this.
SD Cards, Laptop, Software, etc.
I’m using Transcend 32 GB Class 10 SDHC Flash Memory Cards. They’re cheap on Amazon (<$1 per GB) and are fast enough to handle the GoPro's output. If you're like me, you've got a handful of SD cards laying around. Check to make sure they're Class 10 (the fastest data transfer rates) before you toss them in your GoPro. There's no reason not to go with Class 10 cards unless you're extremely cost-sensitive. The GoPro produces high resolution stills and videos. Be prepared to deal with them. I actually experienced some annoyance at trying to deal with them on a 2008 Macbook Pro with only a 500GB drive. I upgraded to a 2012 Macbook Pro with a 2.4GHz quad-core Intel Core i7 processor, a 256GB SSD, and a 1TB drive (via OptiBay kit) and have zero trouble editing in iMovie. Eventually I'll maybe switch the software I use for video processing, but for now iMovie covers most of what I need for simple videos. It doesn't seem to like to export to full 1080p video, only 720x540, but since I'm mostly exporting for online viewing it's not that big of a deal. It may be a limitation of iMovie or it may be a setting I'm missing. If anyone has any feedback, let me know. A lot of people have reported fogging issues with their GoPro as the camera itself heats up with usage. Depending on moisture and temperatures you may experience the same. We ran into it only once in BVI while shooting some video of boat swinging. A quick wipe of the lens and things were fine, however we didn't notice it at first since we weren't using the LCD screen. People say the official GoPro fog strips are a bit pricey, but worth the money. I’ve purchased a pack and plan to use them to prevent fogging issues before they happen. There are some home-made remedies, but these are made to fit snugly inside the GoPro housing without damaging the camera itself.
Finally…
There’s a lot of info and video examples of what you can do with the GoPro online. One of the best forums I’ve found is GoProUser.freeforums.org. You’ll have to register, but it’s worth it to poke around on there.
I love my GoPro HD Hero2. It hasn’t replaced my iPhone as a daily-carry video camera since the GoPro requires more accessories and is a bit bulkier. However it does go on every trip with me now and I’m always trying to find an excuse to use it for something.
Oh wait, Videos!
Here are some videos I’ve taken with my GoPro HD Hero2. Keep in mind these aren’t full resolution. The resolution of the raw videos is far far better.
Curious Kiss Cafe Time-lapse
On on Highway 1 (driving time-lapse)
Snorkeling in the British Virgin Islands (with BlurFix)
Nelz goes Boat Swinging
San Francisco to Monterey drive time-lapse
Full disclosure: Nobody compensated me in any way for anything in this post, however some links are Amazon affiliate links.
Crazy Autonomous Quadrotors
Filed Under Gadgets & Hardware, Geek, Video | 2010-06-01, 23:50
We’re all doomed if they ever become sentient and pissed off.
via danger_ranger
HexaKopter: Awesome Times 6
Filed Under Gadgets & Hardware, Geek, Video | 2010-04-28, 13:19
MikroKopter – HexaKopter from Holger Buss on Vimeo.
File this one under “Amazing Things I Want”. The HexaKopter is the product of some brilliant Germans and is a partially autonomous helicopter * 6. In addition to being remote controlled, it has several modes that allow it to operate on it’s own. It can maintain a GPS position, go into elevator mode (straight up in the air and maintain that height), and even return home on it’s own. In addition it can handle a 1kg payload, and takes some great aerial video and photos due to it’s stability. Besides looking like an incredible amount of fun to fly, there’s also a list of “SeriousUseCases”.
The best part? You can make your own. all the plans (with photos!) are on their wiki and you can buy a kit.
I blame Brendan for inspiring this new techno-lust
Large Gauge Ear Piercings + Hearing Aid
Filed Under Body Modification, Gadgets & Hardware | 2010-02-11, 17:55
In the past, the handicaps of people were generally politely concealed and sometimes considered embarrassing. It makes me very happy that this is changing. Now there are people like Aimee Mullins in the spotlight. For those not familiar, Aimee Mullins lost her legs at birth due to fibular hemimelia. I highly recommend watching her TED talk. Rather than let this hold her back, she has gone on to become an athlete, actress, and model who speaks all over the world about her dozen legs that have been built for her. Her legs are amazing; ranging from custom designed pieces of art, like the wooden legs carved from solid ash, to high tech legs that help her run faster than your average human. Technology has advanced to the point where what was once considered a disability is now merely an opportunity for an improvement both in function and form.
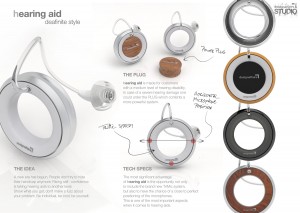
The latest concept in this realm of body advancement are the deafinite conceptual hearing aids. As someone with ears that are already stretched to 1/2″, these things instantly caught my attention. The concept hearing aids basically combine the form and fashion of large gauge ear plugs with the technology of hearing aids which has gotten infinitely smaller over the years. Embedded in the plugs are several microphones that pick up sound, amplify it and deliver it to the wearer through a small earpiece. The result? a fashionable hearing aid that people (who are willing to stretch their ears) can show off.
But the idea of this as just a hearing aid is short-sighted. It’s not a far leap to take this concept and make actual headphones out of this. My 1/2″ plugs are great at ensuring I don’t misplace my pen or sharpie marker, but they would be incredible if they could also function as headphones I never leave in the pocket of… which pair of pants did I wear last Tuesday? Dear tech producers: please make these. You’ll have a small niche market, but that niche will be incredibly happy and I would be willing to pay a small premium for these.
images via designaffairs
Google Navigation.. Yes please
Filed Under Gadgets & Hardware, Video | 2009-10-28, 11:59
I think I’m sold on the Motorola Droid (and Android 2.0) with the addition of Google Navigation:
Google Navigation takes the awesomeness of Google Maps and puts all of it and more onto your Android device.
Up to date map data, easy searching, voice navigation, live traffic reports, searching for stops along your route, satellite AND street view?! About the only downside is how it behaves if it is unable to get a data signal. I’ll still keep my Garmin eTrex vista HCx for those off road trips and for logging tracks, but looks like Google Navigation blows other navigation software out of the water when it comes to driving.
More details over on the Google Blog.
